Introduction
When starting out you can easily become overwhelmed with information including club members. The following is aimed to give you an easy reference to what is/may be needed depending on which route you take.
You don’t have to buy all the equipment mentioned, have a word with Instructors and club members, to ensure that your prospective purchases are correct and before you part with your hard earned cash!
The best magazine for the hobby is Radio Controlled Models and Electronics (RCM&E), which is widely available in good magazine stores (W.H. Smith etc). It contain lots of advertisements (especially for mail order) and will give you a good idea of the prices for the equipment. They often run articles for beginners which can provide lots of tips and hints.
The internet and Online forums are another good way to research information and get an idea of prices. The BMFA have a ‘Classified’ section where you can buy equipment and models but check with other BMFC club members to see if they have anything they want to get rid of. We have an active WhatsApp group which members can share information and sell items. Contact one of the Committee to request joining this group.
The following is a good start as to what you need to consider when starting out:
- Registration with CAA and membership of BMFA
- Competency – making sure you are safe and competent to fly solo – Understanding BMFA Article 16 and RCC test – Buddy system
- Transmitter – What make/model and what mode to fly
- Electric or Internal Combustion (IC) powered model
Registration
As well as joining BMFC (Bromsgrove Model Flying Club) there is a requirement that you are a member of the British Model Flying Association (BMFA). If you’re new to the hobby then you’re unlikely to be a member, but don’t worry, this can be done through the club. This will provide you with the required liability Insurance, monthly magazine, a multitude of documents/guidance and a Flying Centre.
In addition to this you have to register with the CAA, if you are over the age of 18 and own a model aircraft over 250g. You need to obtain an Operator ID from the CAA, which does cost a nominal amount, and has to be renewed on an annual basis. This ID has to be displayed on every model before it fly’s. This ID can be obtained by selecting the link in the footer of the website for ‘CAA Operator ID’. NOTE you do not need to obtain the ‘Flyer ID’ to prove competence as this will be achieved through the club.
Competency

The BMFA has an achievement scheme of which there is the A, B and C tests. To be able to fly solo you need to pass the A test which the club instructors will get you to that standard. We also have several club examiners who can test you when you are ready – See the ‘Who are we’ section.
We train using the Buddy box system which pairs up two transmitters, with the instructor using the master control who can then give the trainee control by holding a switch or button on the master transmitter. This system works well and has saved many models. We have club Spektrum DX6I and Futaba 6EX transmitters to enable this buddy process to work. It’s best if you talk to one of the instructors before buying a transmitter to make sure it’s compatible.
As part of undertaking your A Test you have to undertake and pass the ‘BMFA Registration and Competency Certificate’ (RCC). There is a link to this Website in the ‘Novice’ section of this website. It is an online multi-choice test on the BMFA Article 16 document (see link to Article 16 under ‘Novice’ area), which you can undertake as many times that you need to. It consists of 40 Questions and you have to obtain a minimum of 30 correct answers to pass. There is no cost in undertaking this test but make sure you print a copy of your Certificate so that you can demonstrate that you have passed to test to your examiner. Don’t worry about undertaking the test when you start as you will have plenty of time but you need to have passed it before undertaking your practical test at the flying field. Take the time to read Article 16 prior to taking the test but you can refer to it whilst undertaking the test. Be careful to fully read the questions as some can catch you out in how they have been written. You have been warned!!
Transmitter
You’ll also have to decide on what mode of transmitter you want. There are four modes but the most common is Mode 1 (throttle on right stick) and Mode 2 (throttle on the left stick). Most new transmitters sold in the UK are Mode 2 but they can be swapped over. If you don’t have the knowledge or skills then ask one of the instructors and they will either do it or put you in touch with a club member that can.
The buddy system can be trained on Mode 1 or 2 without any problems as the Transmitters work out the any conversion required.
All new Transmitters work on a 2.4Ghz frequency which you bind to the model. You can still use the earlier 35Mhz frequency with Crystals but we are limited to what frequencies we can use. See the 35Mhz Frequency table under ‘Club Info’ on this website.
Ideally you want to buy a Transmitter with rechargeable batteries. This can be in the form of Nimh, Lipo or Lion batteries as this will save you money in the long term of replacing any Dry cell batteries.
Electric or IC (internal combustion engine) powered?
You may have already decided, but if not you need to consider whether you are going to learn using an electric or IC powered model. Many electric powered trainer models are made from a strong EPO foam whereas as IC will be Balsa. It is fair to say that the electric foam models are easier to learn on and easier to repair, if damaged. It can be quite a step up if you then decide to move onto IC in the future whereas it’s easier to move to electric if you learned on IC. IC models have more momentum, due to the extra weight, which handle windier conditions better. We have a mixture of members some flying electric only, some IC only and others that fly both. It’s something you need to consider because if you decide to change then there is additional cost buying equipment to fly the other type of models.
Electric models
Common models are the high wing Durafly Tundra and Max-Thrust RIOT models. These models come with all the servos, motor and ESC ( Electronic Speed Controller) fitted and just requires you to buy a Receiver, to match your Transmitter, and several 2200mah 3S (3 cell) Lipo batteries. Whilst you’re training it’s a good plan to have a minimum of three flights per flying session, so it’s advisable to have a minimum of three batteries but ideally five to give you more opportunity when the weather permits.
Trainer models tend to use 3S 2200mah Lipo batteries. There are numerous different types of connectors to connect the battery to the ESC, which generally aren’t interchangeable. You can buy solder on Plugs/sockets, if you wish to change them, or buy adaptors.
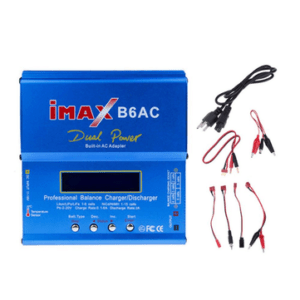
To charge the batteries it is ideal to buy a charger that can charge multiple batteries. There are many on the market like the IMAX B6AC charger but check what power source is required (ie is it mains powered or 12v powered).
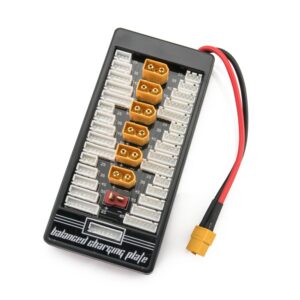
To enable you to charger multiple batteries at the same time then you need a ‘Balance board’ as shown below. Again make sure they have the right connections for your batteries. Only charge multiple batteries at the same time if they are with 10% charge capacity of each other. If they’re not then charge them separately.
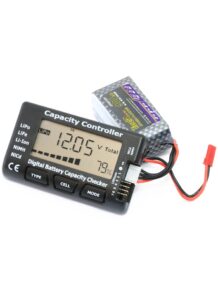
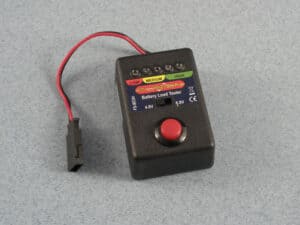
To enable you to check the amount of charge in the Lipo battery then you can buy a cheap battery checker as shown below.
When charging a Lipo then you need to understand what amperage you can charge at. If it’s a 2200mah then you can charge at 2.2 amps. If you have two 2200mah batteries you are charging together then you can charge at 4.4 amps, as they will be connected in parallel.
Is advisable not to leave the batteries fully charged for any long periods of time (week or two) as they can deteriorate quicker. Lipo’s can be very volatile whilst charging so make sure that they are in a safe place and never leave them unattended. Many members charge and store them in old Amo boxes lined with fire proof plasterboard. You can purchase Lipo Safe storage cases which will provide limited safety if anything untoward happens to the battery. TREAT THEM WITH CARE
It’s inevitable that your model will get into a few scrapes, so some glue will come in useful. Foam safe CA (superglue) will come in useful for instant repairs at the patch. ‘Foam 2 Foam’ is another good glue but takes a while to go off so not an instant repair. A Hot glue gun is also useful for doing larger repairs. It dries in about a minute but you need a 230v power supply. You can buy a smaller 3S Lipo powered gun which can be used for repairs at the patch.
One of our Club members delivered a talk on Electric powered models – a copy of the presentation can be downloaded from this Website under ‘Tips for Models’ section then ‘Electric Models’
IC models
High wing 4 channel trainer (i.e. rudder, elevator, aileron and throttle controls). There are now lots of Almost-Ready-To-Fly (ARTF) models on the market that fly very well and are very stable, which is vital for your first trainer model. If you think that you cannot build your first aircraft from a kit, then an ARTF trainer is the ideal solution. Go for an ARTF kit which has all the hardware included (e.g. fuel tank, engine mount, wheels, control linkages hinges etc. etc.). The Arising Star or Boomerang has proved to be excellent fliers, are well built and very robust!
An engine to match the performance of the plane, normally a .40 size or .46 size. You may need to purchase a glow plug for the engine, as most engines are not supplied with one as standard. A good all round plug to buy is an OS No.8. You will also need to buy a suitable propeller for the model; 10 x 7 is the usual size for .40 engine and 11 x 7 for a .46 engine. Although 10 x 8 OR 11 x 8 will be that bit quieter for a .40 OR .46 engine, respectively. (see noise reduction section!) Note that an APC or Bolly propeller is recommended since the scimitar shape substantially aids noise reduction.
To repair these models then PVA Glue is a good strong joint but takes time to cure. Five minute epoxy glue is a two part glue which you mix together and sets in 5 minutes. This glue is very strong and is ideal for areas like the Undercarriage which can take a hammering. CA (Superglue) is great to have in your model box for up the patch repairs. A modeling or Stanley knife is essential when you need to do any repairs.
If you are building from a kit, you will most likely need to cover the airframe – the most popular covering is ‘Solarfilm’ which can be applied with a domestic iron and comes in a huge variety of colours. There are very easy to follow instructions on how to apply Solarfilm included with each roll.
Equipment for Starting the Plane
- Fuel – Straight or 5% Nitro is normal. Model Technics GX-5 is a good all round fuel to use. It is also the cheapest which is an added benefit. If you start doing a lot of flying, some of the more ‘exotic’ fuel mixes can turn out expensive… Note that the number in the designation usually refers to how much nitro (or ignition/power enhancing liquid) is added eg Dynaglo-10 would have 10% Nitro = see the Model Technics web site via the link page.
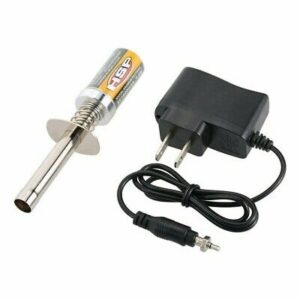
- 2 volt glow plug energizer battery and connecting lead. A 2V rechargeable battery and charger can be purchased, although a popular alternative is the glow driver which is a battery and connector combined. Note that a rubber finger protector or ‘chicken stick’ (200mm length of hardwood dowel wrapped in hard foam and gaffer tape) is highly recommended for flick starting the engine and is very cheap to make.
- Fuel tubing (1 metre) and fuel pump to transfer the fuel into the model. A hand cranked pump will be perfectly adequate to start with, unless you wish to purchase a battery powered pump (see below).
Additional Equipment
- Flight Box. You may buy a ready built one or just use a plastic toolbox from your local DIY store to carry all your bits and pieces easily.
- Power Panel. This is normally powered by a 12V motorcycle battery and includes a fuel pump, a glow battery outlet and 12V outlet for an electric starter.
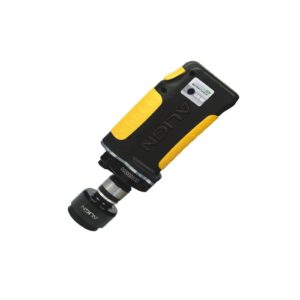
- Electric Starter. This is normally a 12V unit and plugs into the power panel but you can buy a cordless version which uses a Lipo battery, but these are more expensive. (see below image)
Other Notes
- Ensure that you charge your Tx and Rx batteries overnight before flying. Both batteries are ‘trickle’ charged and therefore there is no danger of damaging the batteries by charging them before each flying session. You can check the charge level of a Nimh with a battery checker shown below. This applies a load to the battery when you press the button to ensure the battery will be ok under load.
- All of the above items may be purchased either at a local outlet or online.
- It is a good idea to get your first model checked over by an experienced modeller before that first flight. If you bring the model to either the Club night or the flying field, do not be afraid to ask for some constructive criticism of your building skills!!
Whichever type of model you choose Safety is paramount. You will need to restrain the model whilst it is in the pits being started or the battery being connected. A couple of metal rods, bent over to form a handle, and some pipe lagging to protect the model from the metal bar will suffice. Have a look at what other members have done to find the best for you.